
Learning how to read guitar tab might look a bit scary, but it is made easy as long as someone explains the basics to you – and that is exactly what I’m going to do here. By the end of this post, you will be able to read and play a guitar tab, that’s a promise to all you hobby guitarists out there!
Exciting isn’t it? Because, once you can read and play guitar tab, you can start learning all those songs, riffs, scales – in fact whatever you want.
Just one note of caution though, before we move on. Because anyone in the world can produce and publish guitar tabs to the internet, you get various styles of tab, you also get various quality of tab and some are just wrong. The worst thing is, there is often no way to tell until you have wasted time deciding which version to use and then trying to read it.
Because of this, I recommend guitar tab produced in a consistent way by professional musicians. Or you could go to Ultimate-Guitar They have some great tabs, just make sure you’re always choosing the one with the most/highest rating.

Table of Contents
What is Guitar Tab?
Well, it’s a visual representation of the fretboard showing information on how each string should be played. This means that no knowledge of formal music notation is required (although some guitar tabs will show this as well).
In a typical guitar tab, you will see fret numbers and various other symbols on each string and the order in which notes should be played (and whether they should be played together).
You should be aware right now, that most guitar tabs will not show you which fingers to use – this is left for you to figure out for yourself – doh!
Also, most tabs are produced assuming the guitarist is right-handed – rather unfair to left-handed guitar players; so I have written an article on left-handed guitar tab which I really hope you will find useful.
Guitar Tab Basics
Let’s get straight into guitar tab basics with a blank tab that would look like this:

Look at the letters on the left edge, these are representing the tuning of the strings on your guitar.
You have to imagine yourself holding the guitar in the normal way and that you are bending your neck forward looking down at the fretboard. The E string at the top of the tab is representing the thinnest string on your guitar. Stop a minute to get this fixed in your mind, it’s really important…
So, just to re-iterate, with the guitar held as if playing, looking down on your fretboard, you would see the strings in the order in which you see them on the blank tab above.
Ok, got that? Really get this fixed in your mind it is essential.
This is what the vast majority of guitar tabs will look like (with a bunch of numbers and symbols scattered along the strings, yes, but hold your horses, I’m getting to that!)
Of course, if you are asked to use a different tuning or you have a 7 or 8 string guitar, the guitar tab will look different – but let’s just ignore that for now.
Simple Guitar Tab
Here we go then, a simple guitar tab, where I explain the most fundamental part of guitar tab.
Look at this:

Just to remind you, this is showing you which fret numbers to play on the different strings – and the order in which to play them.
Really important – The most vital bit of information to de-mystify guitar tab – left to right here represents time – that is, the sequence of the notes. They are also evenly spaced which means play them in a steady beat.
It’s vital because it might look like the fingers go steadily further up the neck of the guitar and that is not the case. The fret numbers show you where on the neck, the positioning left to right shows the sequence of the notes over time.
So, this tab is showing you to play (in this order):
5th fret (thickest) E string;
8th fret (thickest) E string;
5th fret A string;
7th fret A string;
5th fret D string;
7th fret D string;
5th fret G string;
7th fret G string;
5th fret B string;
8th fret B string;
5th fret (thin) E string;
8th fret (thin) E string;
3 notes played together on the A,D,G strings;
3 notes played together on the (thickest) E,A,D strings.
Fret numbers start at 1 being the fret next to the nut of the guitar (0 means play the string open).
Remember, when I say play the 5th fret, I actually mean place the finger just behind that fret so that the 5th fret becomes the point from which the string will vibrate.
Also, there is no indication of which fingers to use on tabs you have to do this yourself (For this tab, I would use the index finger on the 5th fret and ring and pinky on 7 and 8 respectively).
Making sense?
If you don’t recognize this, it is in fact the A minor pentatonic scale in first position followed by a D power chord and finishing with an A power chord!
More Complex Tab
Here are the more common, and more or less standard, guitar tab symbols:
- h – hammer on – E.G., 5h7 means play 5th fret and hammer on to the 7th fret;
- p – pull off – E.G., 8p5 means play the 8th fret then pull off to the 5th fret;
- b – bend string up – E.G., 8b10 means to play the 8th fret then bend up so you hear the same note as you would at the 10th fret (a tone or 2-fret bend);
- r – release bend – E.G., 17r15 means to release a bent note that sounds like the 17th fret and release to the 15th fret (this is usually after you have already bent the string up before either having played it or bent up silently before playing it. This is more commonly shown as 15b17r15 or (15)b17r15 where the brackets are showing it is a silent bend;
- / – slide up – E.G., 10/12 means play the 10th fret then slide to the 12th fret, /8 means slide up from somewhere ending with the 8th fret;
- \ – slide down – E.G., 7\5 means play the 7th fret then slide down to the 5th fret, 12\ means to play the 12th fret and slide down without a clear endpoint;
- v – vibrato (sometimes written as ~) – E.G., 12v means play the 12th fret but give it a lot of vibrato (this is typically used when the vibrato is out of the ordinary);
- t – right-hand tap – E.G., 5h8t12 means play the 5th fret, hammer on to the 8th fret (with left hand), and then tap on the 12th fret with the right hand (obviously, left-handers will be using the hands the other way around!);
- x – play ‘note’ with heavy damping – used to indicate that the strings are palm-muted, or fretting fingers have been lifted and the string is plucked/picked to give a percussive sound (sometimes the x shows several strings at once as in funk or heavy rock).
Here is a worked example:
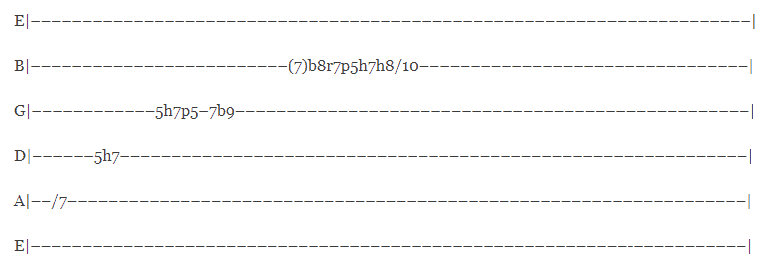
- Slide into the 7th fret A string;
- Play 5th fret D string and hammer on the 7th fret A string;
- On the G string, play the 5th fret, hammer on the 7th fret then pull back to the 5th fret, finishing with playing the 7th fret and bending up so that it sounds like the note at the 9th fret;
- On the B string, silently bend the 7th to the 8th fret and play the 8th fret, then release back to the 7th fret followed by a pull-off to the 5th, hammer to the 7th, hammer to the 8th, and finish up with a slide up to the 10th fret.
Notice as well, the spacing is showing that some portions of the lick have a gap between notes. It is trying to indicate the timing of the lick. This is where tab struggles and you have to take the raw information and make it sound “right”.
It’s great though, isn’t it? You can now easily find out how to play all those songs you love and to learn licks and riffs, new ways of playing scales – the world is open to you!
What Are Some Other Variations in Guitar Tab?
Guitar tab is pretty standard, but many authors will put additional information and symbols on their tabs.
Here are some examples:
- Omitting the string names (notes of the string) – if this is the case, it implies standard tuning or there might be a heading like “Standard Tuning” in the preamble;
- Other string tunings – a classic tuning might be DADGAD and this would be indicated on the left of the tab or again in the preamble;
- Other information in headings, authors often include time signatures, headings to indicate “Verse”, “Chorus” and so on plus instructions to repeat sections;
- You might also see a tab divided by vertical bars “|” to show bars in the music;
- Alternate symbols – authors vary in the amount of information they try to pack into tabs, always lookout for a list of these at the top and foot of a tab that explains the symbols used;
- Left to right, tabs show the sequence of notes, some tabs are more accurate than others portraying the actual rhythm and gaps between notes and passages. All you can really be sure of is the sequence and you need to use your ears to find the phrasing.
My best advice is to read tabs one section at a time and play on your guitar as you go; start off with tabs for music you know so that you will hear if you are reading the tab correctly or not before tackling anything new.
Tab becomes easier the more you read, so try to find high-quality tabs for songs you know to start with and build from there.
The final bit of advice here – take each section of tab one at a time rather than looking at the entire thing. Each section will be no more complicated than the example I gave above, it’s just that if you see section after section like this, it starts to look fairly daunting – just break it down, one part at a time.

What Are The Limitations of Guitar Tab?
And so, I hope you now have a good idea how to read (interpret?) guitar tab.
Remember, it really came about as a way of writing down guitar music without the need for the reader to understand sheet music.
There are massive limitations however, and the only real way of overcoming these limitations is to trust your ears.
Here are some examples of what guitar tab will not tell you and possible things to think about to overcome them:
- Which fingers to use – this is something that will become easier as time goes on and as you start to get used to certain shapes and progressions on the guitar. To start with though, look at the lowest and highest fret number, plan to use index and 2nd fingers for lower fret numbers and ring and pinky for higher. As you master each section, work out how to transition to the next in terms of fingering, and don’t forget that you may need to move your hand position occasionally;
- Phrasing/timing – tabs will really struggle to show you exact phrasing or timings of each note and passage and the gaps between passages. For this, try to understand the time signature and then use your ears to make it sound “right”;
- The attack and duration of a note – whether to pick hard or soft, to sustain the note or to make it short and sharp, whether to let 2 or more notes ring together as you progress are pretty much all things you will need to judge with your ears;
- Technique – tabs most certainly don’t give any clues as to what type of playing techniques to use; you know, alternate picking, sweep picking, hybrid picking and all those other topics that folks will analyze to death! To start with, use the techniques you are comfortable with and just get the sound right, if you decide to learn or improve your technique later, playing what you have learned will absorb these techniques without needing to think too hard about it – honestly!
And there you have it. A rough guide to reading guitar tab from guitar tab basics through to being able to play your favorite songs.
I really hope this has helped you out and you now know how to read guitar tab and can start to explore the many resources available.